Getting the Most Out of an Aerosol Can
And so it was that I found myself reaching not for a traditional can and a brush, but for an aerosol can of lacquer.
In case you are not familiar with it, lacquer is popular with contemporary furniture makers and factories, for it can be sprayed on, dries quickly and rubs out easily.
And I like it for the same reasons.
I also find myself using, when the situation arises, aerosol stains, aerosol spray paint and aerosol polyurethane finishes, both oil-based and water-based. All of this got me to thinking, as occasionally happens, about some techniques I have learned over the years when it comes to spraying on an aerosol finish.
1.) Only buy the number of cans you need for the project at hand. Too often I have reached for a new can I had purchased several months earlier only to discover that, even when brand new, the tip might still not work.
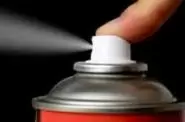
2.) When selecting an aerosol product in the store, pay attention to the quality of the spray tip. Look for tips that you can adjust to affect the spray pattern. The better the tip, the more apt it is to work more than once.
3.) Before spraying, protect the floor and anything around you from the over-spray. It can travel further than you might expect.
4.) Hold the can the distance recommended by the manufacturer from the surface. Maintain that distance the entire time you are spraying. That is not just a number they made up in the lab. Too close and you will get sags and runs. Too far away and the spray will start to dry before it hits the wood.
5.) Pay attention to your index finger. If it inches its way over the top, it will interfere with the spray pattern.
6.) Begin spraying six inches before the can passes over the wood and continue spraying six inches past the end of the wood. This will prevent you from creating a puddle of finish, which is what happens when you depress the tip before your hand starts moving.
7.) Make your first series of passes going against the grain of the wood. Several thin coats are better than one or two thick ones. Immediately make your second pass going with the grain of the wood. This cross-hatch pattern will prevent you from laying down ridges of finish. Let these first two applications dry, then repeat.
8.) The moment you are done spraying, even if just for a few minutes, turn the can upside down and depress the tip. Continue spraying until the propellant has forced all of the finish out of the feeder tube and the tip. Once it sprays clear air, then stop and set the can down.
9.) Shake the can before you begin spraying each time and even a few times between passes.
10.) As the can begins to empty, hold it upright to prevent the feeder tube from blowing propellant rather than finish onto the wood. This may require tipping your project slightly.
11.) Do not attempt to “hit the dry spots” after your first series of passes. This will only create dried puddles of finish. Let it dry, then repeat your cross-hatch pattern.
Good Luck!
– Bruce Johnson